As I have gone on a model building binge, one of the things I have wanted to do (ever since I was a 12 year old kid building models) was to become proficient in the use of an airbrush.
I have no delusions that I am a budding artist. When I was in grad school, in a computational physics course, I was asked to draw a cone intersecting with a cylinder, that was skewed and off axis. It was ugly, and I wrote under the paper I turned in that I study physics, not art, and the prof replied that he felt my pain.
But airbrushing can be a very effective tool in finishing a quality scale model. And I have been reading a lot, and watching videos on YouTube, both to learn the basics, and to figure out how to practice.
I had a simple badger single action, external mixing airbrush when I was a wee lad, but I never got it to work well. Age, and impatience were likely my main character flaws back then that prevented it from being a “happy” experience.
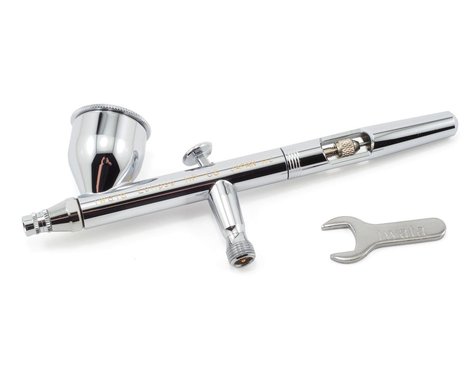
Now, after a metric butt-load of research, I have decided on a dual action, with a compressor, and to start with acrylic paints. That narrowed it down a lot, but I am also at a point in my life where I appreciate a better experience, so I splurged and bought an Iwata HP-CS airbrush, and an AS-18 compressor. A solid setup that ought to last the rest of my days.
It is a gravity fed, internal mixing, dual action airbrush, with a 0.35mm needle.
My first playing with it was, um, less than encouraging. I had thought that I had thinned the paint enough, but apparently not, and it was splotchy, and unsatisfying. Not only that, but I had it set to 12psi, a bit on the low side. (n.b. – that is good for up close detail work, but it also needs even thinner paint)
The experts say that the optimum viscosity of paint is about like 2% milk. So, after my first trials, I just poured some 2% milk into it, and got a good feel for that thickness. Yikes, I was WAY off on my first attempts.
So, I covered my first effort up with a white primer, and then did some sanding to prep the surface.
Today I mixed some Tamiya Olive Drab with about 2 parts thinner in the cup, and used an el-cheapo paint brush to mix. It was still a bit thick, so I added a few more drops of the thinner, and presto, it was good.
After spraying a few test swatches on a polystyrene sheet (I bought them from Amazon, to use for experimentation and learning) I got pretty good trigger control down, and then I went to work putting a baseline of Olive Drab on the top of the Spitfire I am building. It is a Revell 1:48 kit, and it was only $16, so it is a good experiment to get better at this.
This time, after masking, it came out looking pretty darned good. Several coats, to get a nice, even coverage, I am pretty happy with the results.
Overnight for it to dry, and then I will remove the masking and work on masking the bottom to paint the underside. The kit says to paint it Sky Blue, but I think I will go off label and paint it a light grey.
One thing I am learning, that hampered my youthful experience of model building, is patience. Do a little bit at a time, but don’t rush it. Let glue set overnight. Allow paint to dry fully. Clean and sand between coats of paint. Don’t rush. Allow the building to be zen.
On the kit, it was inexpensive, so I didn’t expect much, and I will admit that the cockpit bits don’t quite fit with the fuselage halves. Meh.
Next kit is a higher quality Tamiya Brewster Buffalo with “Pacific Theater” markings. That looks to be a far sharper kit to build, with a lot more detail.